Long before I got into consulting I used to sell leads to mortgage brokers.
(If you want to talk about shady, look into generating and selling leads for mortgage brokers. Sheeesh.)
We sold leads for about $100 a pop, which was about 20x more than most other lead providers were charging.
Companies like LendingTree would generate a single lead and sell it a bunch of companies. We generated exclusive leads and sent it to one company. We had more demand than we could possibly handle.
Why?
Mortgage brokers realized that the first person to get a lead on the phone was statistically going to come out on top and win the client.
If it meant paying a premium on an untouched lead that was significantly more likely to close, it was a no-brainer.
So when I started to grow my agency and we started generating leads of our own, I made sure that we followed up on new leads as soon as possible. It didn’t matter if it was midnight — if my phone dinged and it was a new lead, I’d respond right away and try to setup a meeting.
Our leads raved about our responsiveness. You wouldn’t believe how many times I was told, “I haven’t heard back from half of your competitors!” It worked, and it was one of the things that I credit to winning so many blind inbound leads that reached out to us (after Googling us or being told by a peer to check us out.)
But we don’t want to be glued to our inboxes.
We don’t want to be stuck responding to emails in the wee hours of the night.
You should automate your handling of new leads
Over the last few years, a number of tools have been created that make qualifying new project leads easier than ever. Had these tools existed back when I was running my agency, I could have kept my phone off at night.
I want to show you something that I recently setup for an agency client of mine. They had a #firstworldagencyproblem… they were getting more leads than they could handle. They couldn’t qualify and schedule free consultations fast enough. Their single sales lead was scrambling to keep track of new leads, dud leads, and leads who had confirmed a time to meet. So they decided to bring me in to help with automating their lead capture, qualifying, nurturing, and booking process. They knew that if they could keep their salesperson focused on selling they’d massively increase their conversion rates.
But what about you?
You probably aren’t swimming in leads. But you probably value the time you spend focused on things that push your business forward, like closing new deals and delivering amazing work to your clients. And the strategy I used for this agency works if you get 100 leads a week or 1 lead a week.
It centers on automation and gluing a lot of off-the-shelf tools together. It doesn’t require any programming experience, but it will cost you a little over $100/month to get up and running. However, once you’re up you’ll have a machine that captures leads, filters out the wheat from the chaff, educates them on your process and what you offer, and finally books them in your calendar.
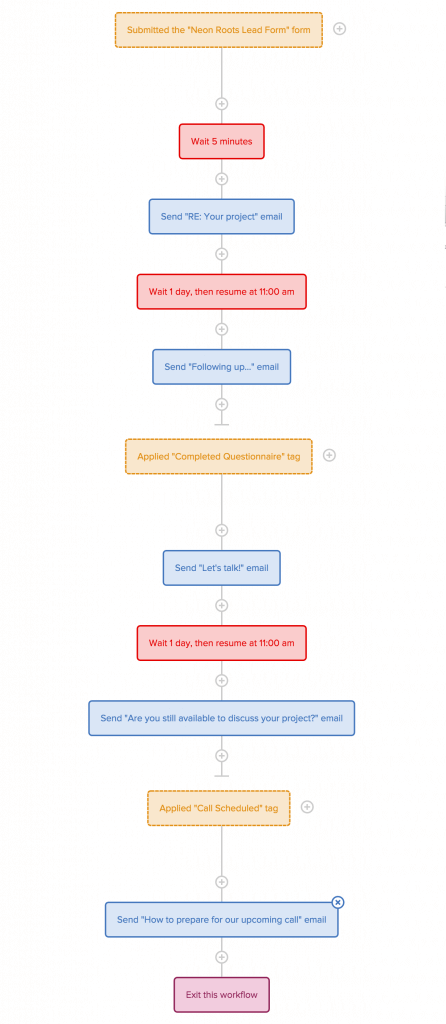
What our final Workflow in Drip will look like.
You then just need to show up and get on the phone. The rest is taken care of for you.
Why should you automate?
- You’re guaranteed to respond faster than your competition, who are also having their contact forms filled out by that same project lead.
- You look a heck of a lot more professional. It’s obvious you’ve done this before and know what you’re doing.
- You’re able to spend more time doing stuff that doesn’t involve responding to new leads and juggling calendar days and times.
What tools will we be using?
- Drip for email capture and email marketing automation ($49/mo for up to 2,500 subscribers)
- Pipedrive for your sales CRM ($12/mo)
- YouCanBook.me for booking your calendar (£9/mo, or ~$13/mo) – unfortunately Calendly doesn’t integrate with Zapier
- Typeform for qualifying your leads ($35/mo)
- Zapier for gluing it all together ($20/mo)
We’re going to be using Drip’s brand new Workflow editor to setup our funnel. Acquired leads will be stored in Drip (for future email marketing needs like newsletters) and we’ll be syncing these leads to Pipedrive, which is a Kanban-style method of tracking deals. You’ll be primarily focused on looking at Pipedrive for a real-time feed of your current deal pipeline.
Step 1: Acquire leads
You probably have either a contact form or an email link on your website. I’m going to cover how to handle just the example of a contact form in this guide, but will write a follow-up article later with instructions on intercepting new lead emails and forwarding them into your funnel
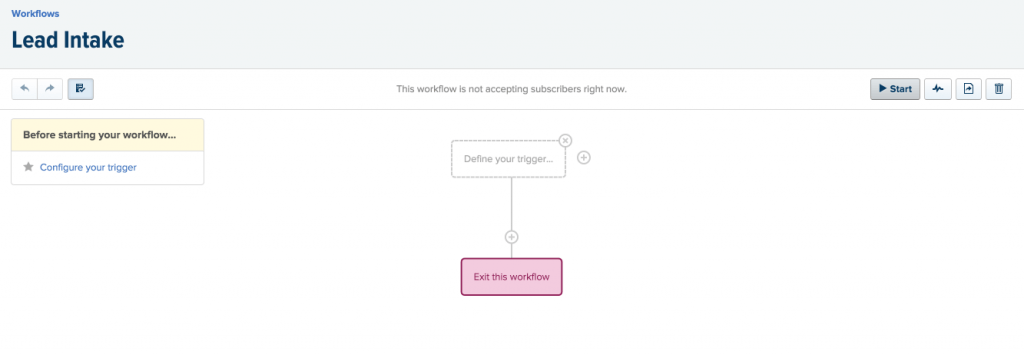
In your Drip account, click “Automation” and create a new Workflow.
Think of a Workflow as a top-to-bottom flowchart. Somebody (a subscriber) enters from one of the triggers at the top of the workflow and flows downward. Remember the Plinko board from The Price Is Right? It’s a bit like that. You can have a bunch of if/then’s that determine how a subscriber gets to the end of the workflow.

Create a new form
Click “Forms” in Drip and choose New Opt-In Form. Name it “Website Lead Capture” or whatever you’d like. We’ll just use the stock toaster widget that Drip provides. Give it a headline and description, and in the fields form at the bottom of the form editor add “Name” as a field and “Phone”.
Make sure you activate the form and save it. And on the “Confirmation Settings” tab, select “Send campaign-level confirmation emails” (this will disable Drip from sending a “Confirm your subscription” email, which makes no sense in the context of capturing website leads.)
Great. You have your first form. As long as you have the Drip JavaScript wired up on your site, you should see it slide up. Alternatively, you can be more traditional and embed the form on your page.
Use this form as a trigger in your newly created Workflow
Go back to your Workflow and click “Define your trigger”. The event is “Submitted a form”, and once you’ve selected that choose your newly created form.
Setting up Pipedrive
Finally, once a new lead has opted in, we want to sync them into Pipedrive.
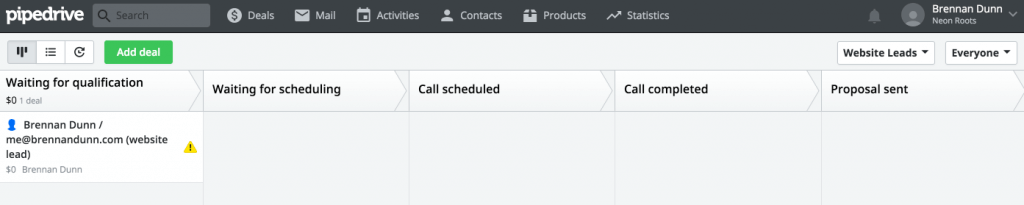
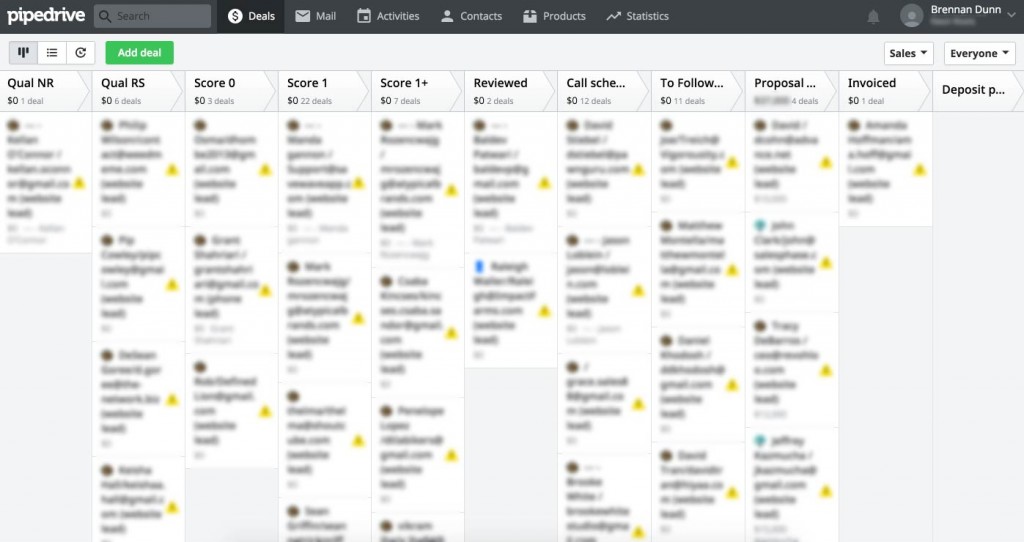
Here’s a screenshot of what the pipeline (board) you setup in Pipedrive is going to look like. You have 5 columns:
- Waiting for qualification. Captured leads from your website will be automatically added to this column. These are people who have submitted your lead form but haven’t yet filled out your qualification survey. You won’t touch this column.
- Waiting for scheduling. Once someone has filled out their qualification survey, they’ll be moved to this column. We’re now waiting on them to schedule a time to meet with you. You won’t touch this column.
- Call scheduled. When someone has scheduled a time to meet with you, they’ll be moved to this column. After successfully meeting with a lead, you’ll move the deal card from this column to the “Call completed” column.
- Call completed. A holding bin for people who you’ve met with, but aren’t at the point of sending out a proposal for a project or Roadmapping engagement. After you’ve sent your proposal or pitch, you’ll move deals to the “Proposal sent” column.
- Proposal sent. You’ve pitched them on a project or Roadmapping engagement and the ball is now in their court.
The early columns will be automatically managed for you, and you’ll only start getting involved in Pipedrive after someone’s been scheduled to talk with you.
Feel free to add additional columns like “Deposit invoice sent” or whatever else is standard in your sales and onboarding process.
Here’s what we’re aiming for (this is for my agency client, who does a lot of lead scoring and has multiple lead acquisition sources):
Sending leads to Pipedrive
Now we’re going to use Zapier to automatically send new leads that Drip captures to Pipedrive.
If you’ve ever used or heard of IFTTT, then you’ll be familiar with how Zapier works. It’s a way to link numerous services together based on an input trigger and an output action. For instance, let’s say you want to send a tweet whenever a Google Doc of yours gets a new row added to it. You could use Zapier to do that, along with any number of other integrations — and with zero code needed.
Let’s look at how we’ll link Drip with Pipedrive.
From within Zapier, create a new Zap (integration):
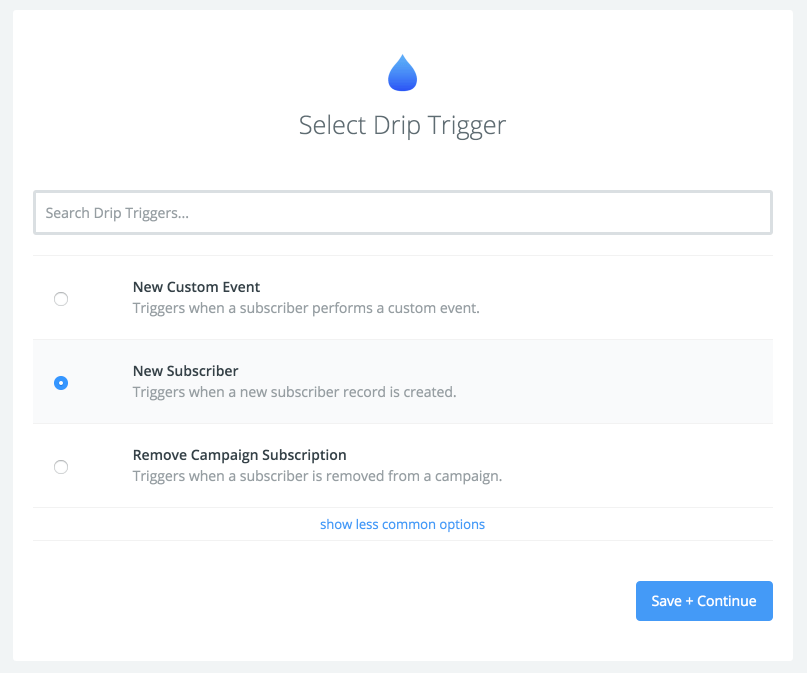
Select Drip from the list of trigger apps, and choose “New Subscriber” as the event you want to act on.
Zapier is going to ask you to integrate and send over a test lead. The easiest way to do this is to open up the hosted URL of your Drip form and submit some dummy data while Zapier waits.
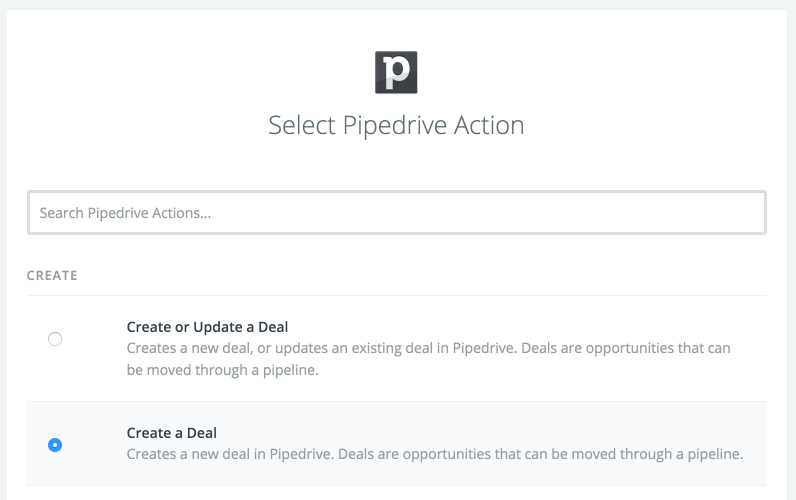
Now we want to choose the action app, which is Pipedrive.
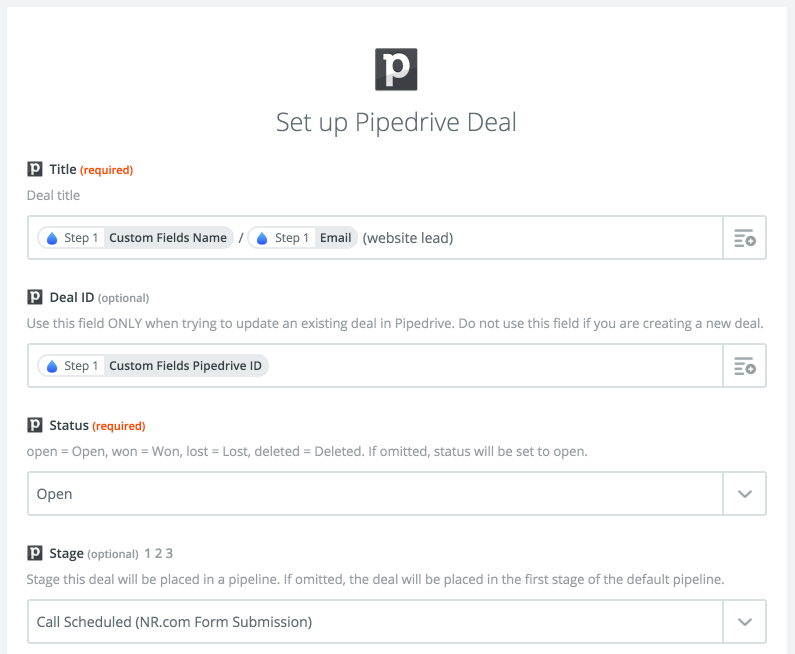
When Drip adds a new subscriber, create a deal in Pipedrive.
Setup your Pipedrive deals to look like this:
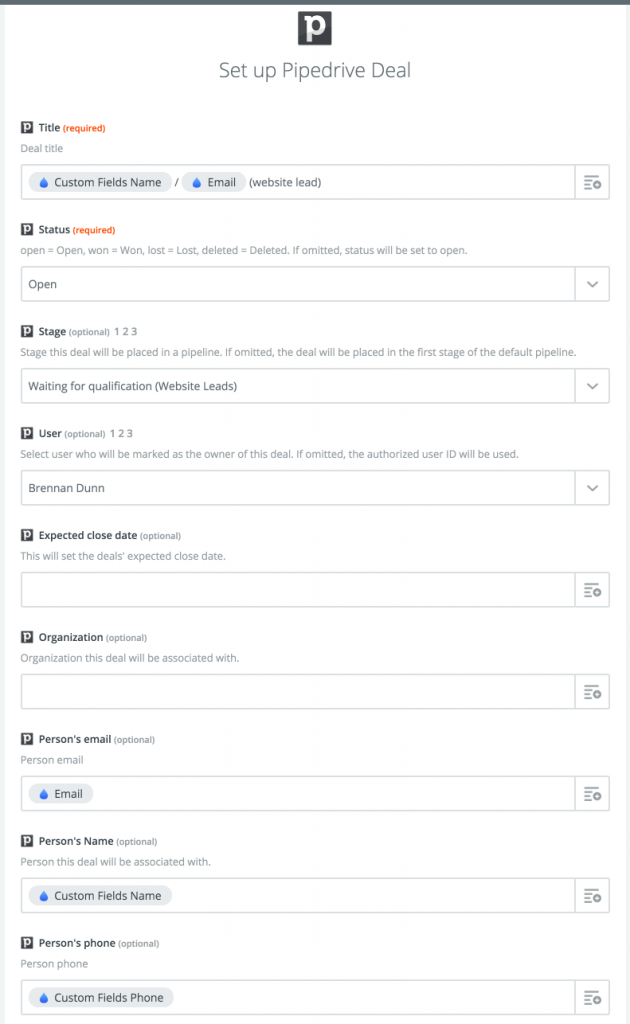
Now activate the Zap, and you’re good to go. New subscribers will automatically be added to your Pipedrive “Waiting for qualification” column.
Note: This is going to add all new subscribers in Drip to Pipedrive. If you have an email newsletter opt-in or something that you’re currently using Drip to manage, you probably don’t want all of those people being pushed into Drip. At the moment, Drip’s Zapier integration doesn’t have “Subscribes to a Workflow” as an option, since it’s a relatively new feature. I’m sure that’ll be coming any day now, and once it does you’ll want to use that instead of “New subscriber” so that we’re only capturing people who enter our Workflow.
Syncing new Pipedrive deals with Drip
The next step is to sync any new deals that get created in Pipedrive into Drip. We need this done so we keep Pipedrive and Drip in sync — think of the Pipedrive deal ID as a sort of primary key for this lead.
Create a new Zap and have it triggered when a new deal is added to Pipedrive.

Set an action that updates an existing subscriber. We’re going to map the deal’s associated email (“Person Email”) with the Drip email address, and add a custom field called “pipedrive_id”.

Now we’ll have Drip contacts linked to Pipedrive deals, which is a requirement for all the Zapier integrations we’ll be setting up.
Step 2: Send welcome email and link to qualification survey
After we’ve added your acquisition trigger, the next step is to send out your initial email. This email introduces you and asks the lead to fill out a brief project intake form.
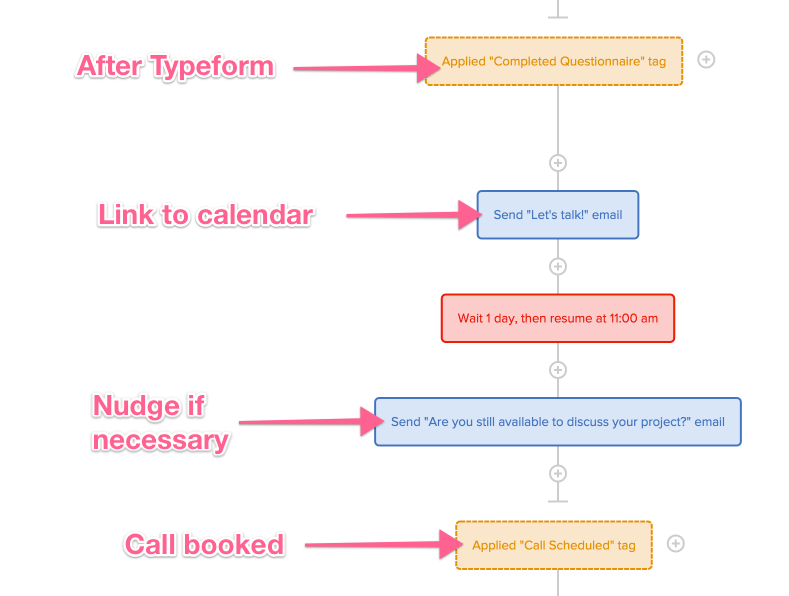
Let’s look at how this will look in Drip’s Workflow editor:
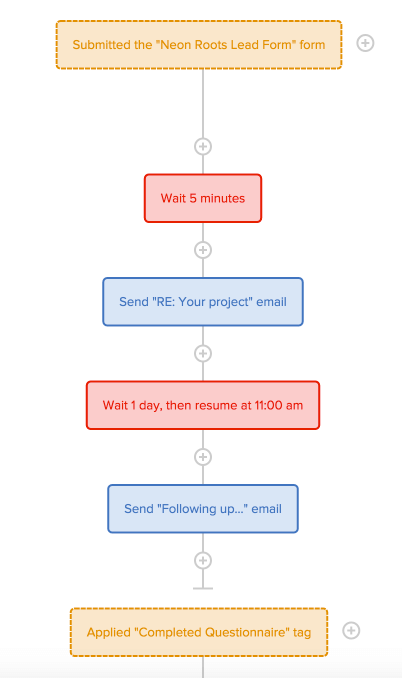
Once the lead form has been submitted and the new lead synced with Pipedrive, we’re going to send an email and wait for the questionnaire to be submitted.
Let’s break down what we see in the above image:
- The lead form is submitted, which causes a subscriber to enter this Workflow.
- A 5-minute delay takes place (we don’t want the email sent TOO quickly!)
- An initial email with the subject “RE: your project” is sent to the subscriber. This is the template I talk about in the first section of Double Your Freelancing Rate and in lieu of embedding the qualifying questions in this email, we’re asking them to fill out a survey questionnaire.
- We wait a day.
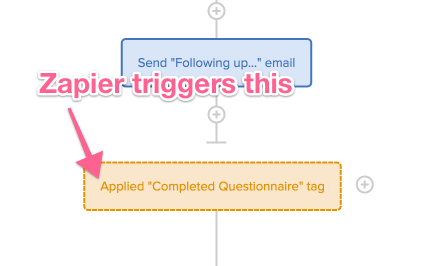
- Another email is sent following up that first email.
Let me take a moment to talk about how the workflows work: you’ll notice another yellow box at the bottom of the screenshot above. That’s the goal that we’re shooting for: that the subscriber gets the “Completed Questionnaire” tag applied. When Drip detects that tag being applied, it’s going to jump ahead to that goal and continue down the Workflow. So if they get that tag applied (i.e., complete the survey) after that first email is sent, they’ll never be sent the follow-up. If they apply it after the followup, great. If they never apply it, they’ll never move forward.
You could conceivably add a bunch of followup touch points here (as you should!), and as a last ditch effort tag apply a tag that signifies that you lost that lead and include them in future newsletters. What’s nice is that you’ll be able to entirely remove the need to think about following up with people who aren’t responding — Drip will automatically send follow up emails for you.
Email templates:
For the initial email…
{{ subscriber.name }},
Thanks for inviting us to help you with your project!
We’re a bit different than a lot of agencies — our focus is chiefly on helping you succeed. Not just building you an app or website, but helping you build it the right way from the ground up.
To get started, we need to learn a bit more about you and your business goals.
-> Click here to take our new project intake survey
(It only takes about a minute to fill out.)
Once we get that, we’ll follow-up with you to schedule a time to jump on a call so we can discuss your project and its goals.
Talk soon,
Brennan Dunn
Foo Bar Consulting
And the follow-up…
{{ subscriber.name }}, yesterday you expressed interest in our services and I wanted to make sure you got my email.
My schedule’s open and I’m want to make sure we get a chance to discuss your project ASAP.
1. First, spend a few minutes filling out this survey
2. We’ll then email you with a link to my calendar so we can find a time to talk this week or nextBrennan Dunn
Foo Bar Consulting
Step 3: Qualify new leads
We’re going to be using Typeform for surveying new leads. There exist a number of online form building tools that could do what we need, but we have two minimum requirements: 1) It must integrate with Zapier and 2) it must support hidden fields. This rules out Google Forms, which I initially was hoping would work for this guide (since it’s free).
Alternatives to Typeform include:
- Gravity Forms, which supports a hidden field parameter. Requires WordPress.
- Wufoo, which seems to allow hidden fields with a little Javascript.
Here’s what we’re going to setup:
- When Drip sends out the email with the link to the survey, we’re going to embed the lead’s Pipedrive ID in the URL and pass it into Typeform.
- Typeform will store that Pipedrive deal ID as a hidden field and pass it along to Zapier once the form is filled out.
- Zapier will store survey as a note attached to the deal within Pipedrive and move them into the next stage of your deal pipeline.
- Zapier will also let Drip know that the qualification survey is filled out, and move them into the next part of the Workflow.
Get a Typeform account
The first thing you need to do is sign up for a Typeform account. You’re going to need to choose the $35/month paid account, as their free account doesn’t support hidden fields (which is a requirement). Once you’re in, create your first form.
Here’s mine:
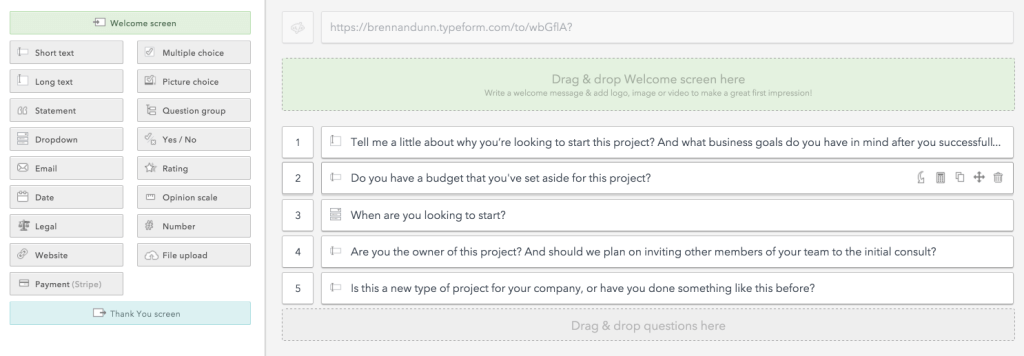
(These are the questions that I use in the section on qualifying clients in Double Your Freelancing Rate.)
Typeform has some really pretty templates and design options that I encourage you to play with.
Enable hidden fields
You MUST enable hidden fields for your form, which is a toggle at the bottom of the form editor. Once you click it, here’s what you’ll see:
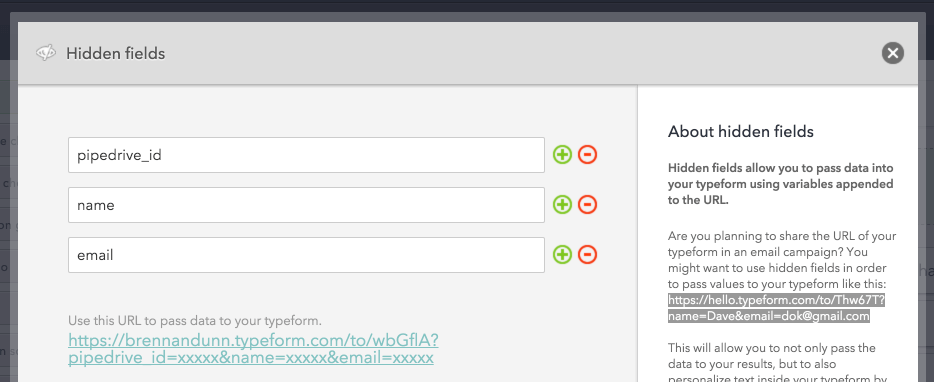
We’re going to add “pipedrive_id”, “name” and “email” as a hidden field. We need this information when we get to working with Zapier.
Link to the Typeform form in Drip
The next step is to link to the form, including the Pipedrive deal ID, email, and name of the subscriber, in the email template I gave you above. Notice the {{ subscriber.pipedrive_id }} — that’s what you’re going to substitute in place of the “xxxxxxx” that Typeform gives you. Do the same for {{ subscriber.name }} and {{ subscriber.email }}.
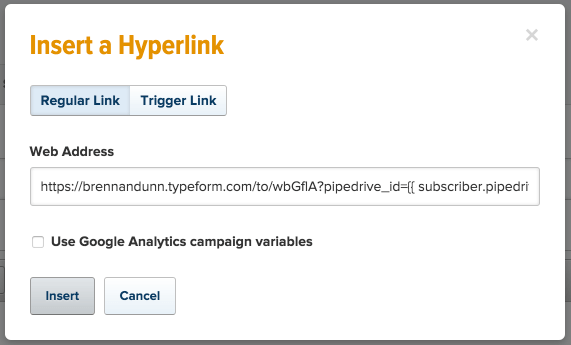
Perfect! So now we’re sending people to your qualification survey form and passing in the subscriber’s data. We’re getting there!
Let Zapier do its thing and automagically link up Typeform, Drip, and Pipedrive
This used to be so much harder to do, but coinciding with the launch of Drip’s excellent new Workflow feature, Zapier also released multi-step Zaps. (I swear, they’re working together and knew I’d be writing this a guide like this.)
Create a new Zap, and choose Typeform as the trigger. The only option it provides is to trigger based on a new form submission.
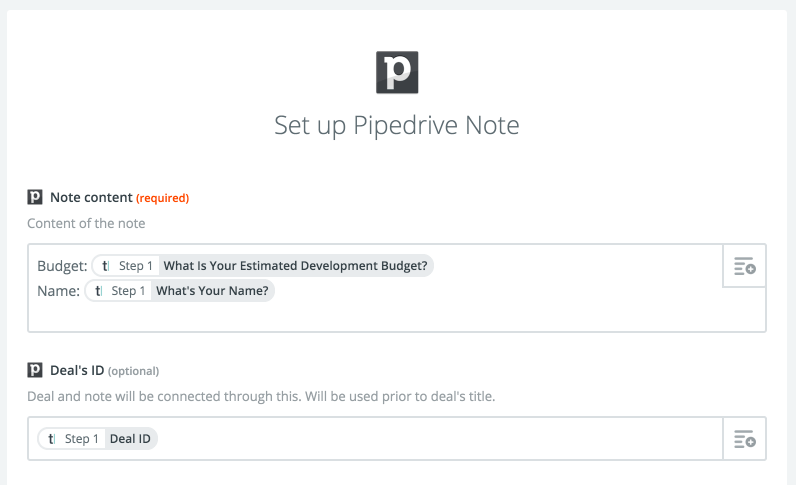
The first action will be to store a note in Pipedrive. When you get on a sales call or review a lead in advance, you’ll have all their form data accessible in one place. Create key/value pairs like below for each question that you ask in your qualification survey.
Also, be sure to set the deal ID that Typeform captured and map it in the Deal’s ID field. This is how we add this new Pipedrive note to the right Pipedrive deal.
Now that we’ve created the note in Pipedrive, we need to update the deal itself. This will be another action we add to this Zap (in the old days, we couldn’t do this — we had to have ONE trigger/action per Zap!)
Add another action to your Zap, select Pipedrive as the action app, and “Create or Update Deal”
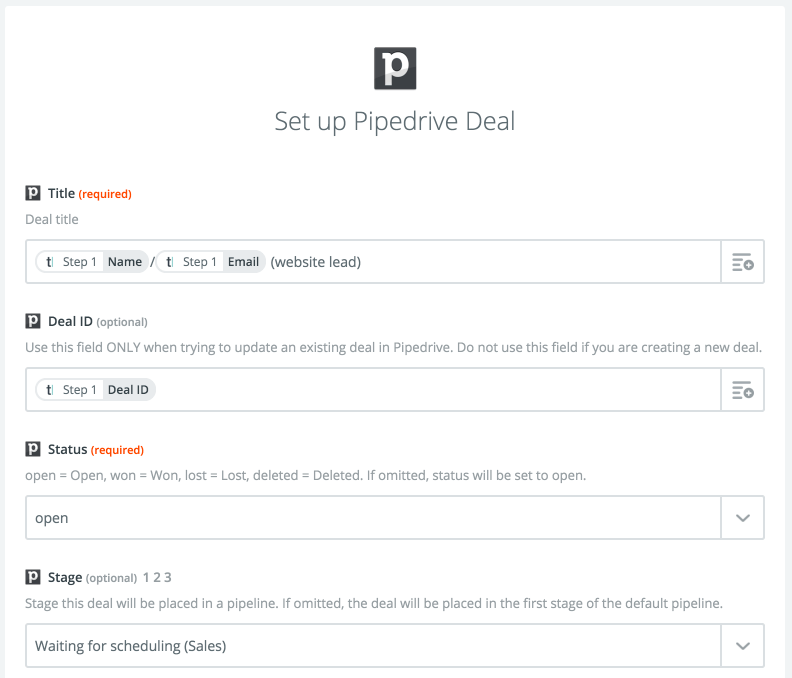
Note that all of this information (name, email, and deal ID) wasn’t sent inputted by the lead in Typeform — instead, it all came over as hidden fields. The reason we needed both name and email as a hidden field is that in order to update a Pipedrive deal, we must provide the deal title. Since our formula is “<Name> / <Email> (website lead)” this means we need both variables. (Pipedrive: If you’re reading this, it’d be great if the API could be changed to allow us to not require resetting the Deal Title when updating an existing deal with a Deal ID.)
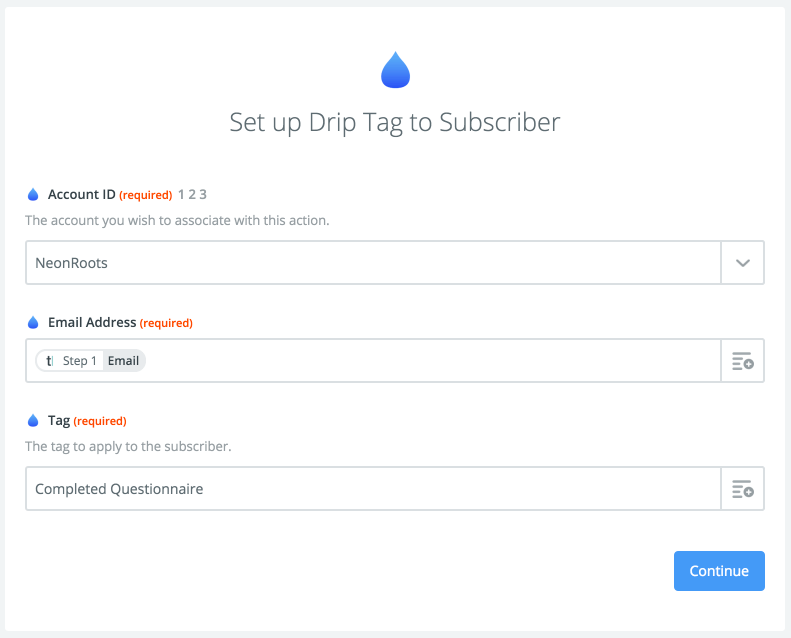
Lastly, we’re going to tag the subscriber in Drip, which moves them to the next stage of the Workflow. If you recall, once the “Completed Questionnaire” tag is applied, the lead is then moved to the next stage of the funnel.
So there we have it. A Typeform survey form is submitted and:
- A note is attached to the deal card in Pipedrive with all the details of the survey.
- The deal card is moved from “Waiting for qualification” to “Waiting for scheduling” in Pipedrive.
- The “Completed Questionnaire” tag is applied in Drip, which moves them to the next stage of the Workflow.
Step 4: Schedule leads who have filled out your qualification survey
Now it’s time to get these new leads in your schedule.
Gone are the days of bouncing days and times back and forth — we’re going to allow qualified leads to automatically book a time on your calendar that’s convenient for you and convenient for them.
Once somebody has completed your questionnaire, you’ll now send them a link to book themselves in your calendar.
Sign up for a YouCanBook.me account
(Update: You can also use Calendly.com, which now has a beta release version of their integration with Zapier.)
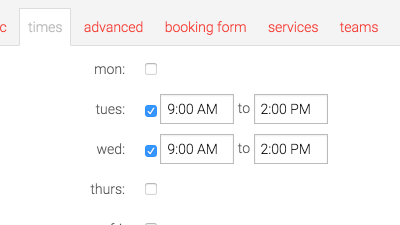
If you’re already using something like Google Calendar, by signing up for YouCanBook.me with your Google account it’ll take the time slots you earmark for meetings in YouCanBook.me and subtract any entries that already exist in your calendar. For example, I usually allow between 9am and 2pm on Tuesdays and Wednesdays for meetings. Any existing stuff I already have in my calendar — doctor’s appointments, random business meetings, etc. — will be taken out of your available slots.
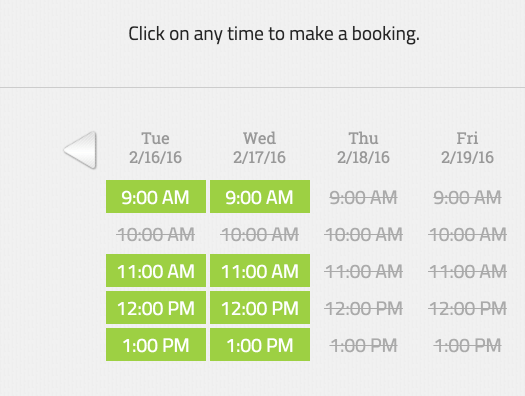
Here’s what this will look like for your project leads:
Link to your calendar within your Drip automation emails
Now you just need to link to your YouCanBook.me calendar in the email that you send out after somebody has submitted your qualification survey.
Thanks {{ subscriber.name }} for telling me a bit more about your business and your project!
Below I’ve linked to my calendar. Please take a moment to book a time that works well for you and your schedule to jump on the phone for an initial 20 minute consultation.
-> Book your free consultation
(My calendar fills up quickly, so please book ASAP.)
Sprinkle some more Zapier magic
You know the drill: create another Zap in Zapier.
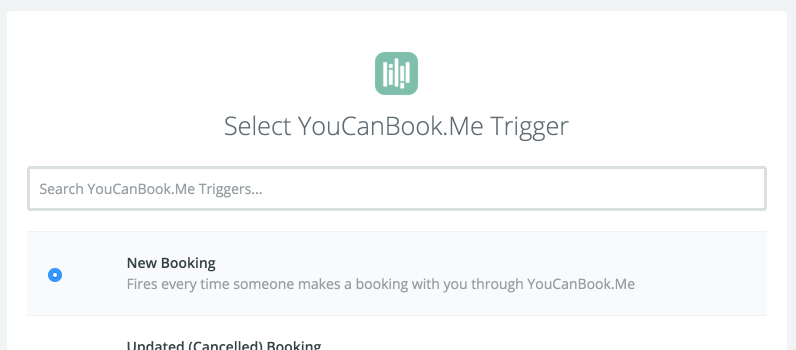
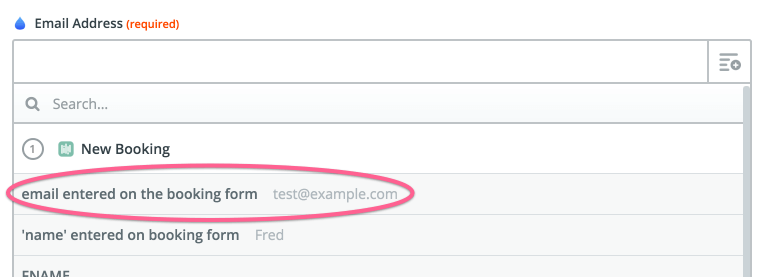
After setting up your YouCanBook.me action, create a trigger that applies the “Call Scheduled” tag in Drip. We’re going to choose “Add Tag to Subscriber” and map the email address submitted by YouCanBook.me to the email address we have in Drip.
Have it apply the “Call Scheduled” tag, which will trigger Drip to move the subscriber to the next stage of the Workflow.
…We need one more Zap 🙁
Unfortunately, we still need another Zap. Here’s why:
Remember how we need 3 things in order to update a Pipedrive deal? We need a Pipedrive Deal ID, a name, and an email address. YouCanBook.me only offers the latter, and as far as I know there’s no way to pass in hidden fields like we did with Typeform.
No problem, though. YouCanBook.me is causing Drip to apply a tag, but we can now setup a Zap that will trigger Pipedrive when a tag is applied in Drip.

And once you’ve created the trigger create an action that updates a Pipedrive deal:
Now new bookings in your calendar will be moved from the “Waiting for scheduling” to “Call scheduled” column in Pipedrive. Here’s a recap of what this stage of the funnel looks like:
Step 5: Prepare people to talk with you
Your leads are surveyed and scheduled. Finally, you want to prepare them to meet with you.
This doesn’t require any more Zapier magic or whatnot. Now we just need to send some instructional copy to the prospect to let them know what to expect when you meet with them.
{{ subscriber.name }}, I’m looking forward to meeting with you!
I’ll be calling you from 757-555-5555 at the time you selected. Should you need to reschedule, email me at anytime and we’ll find another time.
These calls are kept short — just 20 minutes. I know how busy you are, and I want to make sure that you walk away from our call knowing whether or not we’re a good fit for each other.
Here’s what we’ll be covering:
- How this project will affect your underlying business.
- What defines success and what defines failure.
- The steps you’ve taken to solve this problem so far (if any).
- A few options for solving this problem as quickly and efficiently as possible.
So that we can make best use of our time together, please come equipped with:
- Any analytics data that you have
- An overview of your sales funnel, and typical conversion percentages for each stage.
- Rough financials: customer LTV, cost per acquisition, and other KPIs you’d like to share.
(I know this information is valuable, so please click here to digitally sign my non-disclosure agreement. I’ll countersign once you sign.)
The reason I ask this is that I only want to work on projects where I know I can yield a return-on-investment. If decide that I can significantly help your business, I’ll then send you details on what the next steps are.
Obviously, you’ll want to modify the above to fit your tone and the kind of work you do, but I’ve had a lot of luck over the years with the above template. It perfectly sets someone up for an initial, concise consultation call that leads to a paid Roadmapping engagement.
Step 6: Sit back, relax, and close deals
Now that this system is up and running, your job is to just show up for calls and answer any random emails that come in that don’t conform to the process we’ve created. Ultimately, this will allow you to focus more on selling and less on vetting and scheduling candidates, which no matter the size of your company is a very good thing.
There’s not much left to do — your system is up and running.
However, there are plenty of interesting things you could try next:
- Use a decision tree in Drip to conditionally send someone who doesn’t qualify (maybe they selected too low of a budget) to a generic newsletter sequence or subscribe them to an informational email course. For those that qualify, allow them to schedule.
- When you move someone manually in Pipedrive from “Call scheduled” to “Call completed” (by dragging the card from one column to another) trigger in Drip an email sequence that sends somebody your Roadmapping proposal and supporting documentation, along with a deposit payment link.
- Setup a Workflow that automatically follows up with past clients of yours, and have it automatically solicit referrals and testimonials.
Hopefully, this guide has given you a solid system that you can employ right away in your business. And at a minimum, it’s given you a good overview of what can be done with Drip’s new Workflow functionality and the (literally endless) possibilities that Zapier affords.
Any questions? Drop a comment below.